Hey Readers! Welcome to yet another post where I play with a self designed neural network.
This CNN would be tackling a variant of classical MNIST known as Fashion MNIST dataset . Before we start exploring what is the approach for this dataset, let's first checkout what this dataset really is.


The Code mentioned above has been used to create our Convolutional Neural Network which trains about 5.1M parameters! (Takes about 45 minutes to train with 150 epochs)

The accuracy vs epoch trade-off curve shows out to be like this :

Well, it's safe to say that our model reaches a 90+ accuracy score . But how about drawing a parallel between what is the original image vs how our network perceives it?
The Training Image with encoded label :

While the CNN imagery of the same image :

But, how do I achieve that? For this imagery, I have used a dummy model with a single filter learning process. You can use the code below as a follow on for the same.
This CNN would be tackling a variant of classical MNIST known as Fashion MNIST dataset . Before we start exploring what is the approach for this dataset, let's first checkout what this dataset really is.
Fashion-MNIST is a dataset of Zalando's article images—consisting of a training set of 60,000 examples and a test set of 10,000 examples. Each example is a 28x28 grayscale image, associated with a label from 10 classes. Zalando intends Fashion-MNIST to serve as a direct drop-in replacement for the original MNIST dataset for benchmarking machine learning algorithms. It shares the same image size and structure of training and testing splits.
The original MNIST dataset contains a lot of handwritten digits. Members of the AI/ML/Data Science community love this dataset and use it as a benchmark to validate their algorithms. In fact, MNIST is often the first dataset researchers try. "If it doesn't work on MNIST, it won't work at all", they said. "Well, if it does work on MNIST, it may still fail on others."
Now, Talking about the kernel , I will be using this kernel : My Fashion CNN Network as a reference for the following code.

Data pre-processing
Starting off with the basic process of data acquirement and pre processing, the following code can be used as a good starter.
A little data analysis
I believe we should first acknowledge the beauty of this dataset, Upon establishing a count plot, one can easily check that how uniformly the samples are distributed among the different item labels.
6000 samples for each label. Beautiful! isn't it?
Model Creation
The Code mentioned above has been used to create our Convolutional Neural Network which trains about 5.1M parameters! (Takes about 45 minutes to train with 150 epochs)
The accuracy vs epoch trade-off curve shows out to be like this :

Well, it's safe to say that our model reaches a 90+ accuracy score . But how about drawing a parallel between what is the original image vs how our network perceives it?
The Training Image with encoded label :

While the CNN imagery of the same image :

But, how do I achieve that? For this imagery, I have used a dummy model with a single filter learning process. You can use the code below as a follow on for the same.
The Call of Duty
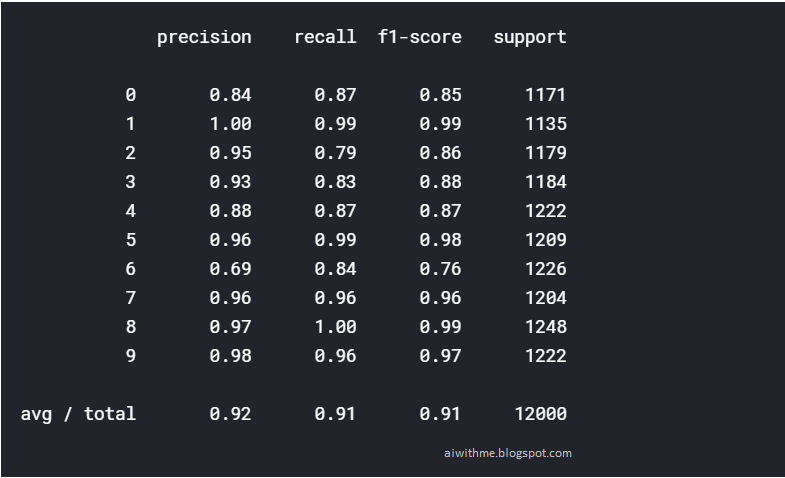
Now let's simply check out our model off a validation set and see the results.
The following classification matrix tells us one thing for sure. Our model is pretty accurate in predicting most of the fashion items. Its best performance can be seen in the fashion label 1 with a 100% accuracy while the worst has to be the label 6 with only achieving 69% precision.
Comments
Post a Comment